
Like all historical wargames, Flames of War is at its best when realistic match-ups are played. While “blue-on-blue” battles (e.g. US vs. UK) are completely possible under the rules, they really aren’t as satisfying as historical opponents facing each other. Flames of War focuses on the European Theatre of War and Germans are therefore the major opponent force for practically everybody. The other Axis partners played much smaller roles and are usually limited to specific settings (e.g. Italians mostly to the Africa campaign in mid-war, Finns to the Winter War period, etc.). It was therefore important that my German army can cover a wide range of locations (at least Eastern and Western front), time periods (at least mid to late war) and company types (at least all the conventional formations such as Grenadier, Panzergrenadier, Panzer, etc.). With this is in mind I carefully merged the force composition requirements from all briefings to create effectively a superset of requirements for each unit. For example, the German infantry HQ unit is normally only two command bases with possibly some form of anti-tank figure. To cater to the wide range of periods and company types, this had to be expanded to include both Panzerknacker (for mid war) and Panzerfaust (for late war) command bases, sniper, all AT options including multiple Panzerschreck/faust units for Sturmdivision formations, halftracks for armoured Panzergrenadier formations, trucks & bikes for regular Panzergrenadier formations, and some infantry bases with Panzerfaust figures to enable some of the more specialised formations. This super-set allows me to field pretty much any company type available in the German briefings.
The painting scheme for the army was likewise influenced by my desire to cover both the mid-war and late war period. The only way to achieve this was to place the uniforms, equipment and camouflage into the transition period between the mid and late war timeline. Thus, infantry has field grey uniforms that are typical in mid-war but continued to be used by many formations into the late war period due to the limited supply of camouflage uniforms. Vehicle patterns are basic camo stripes over Panzergelb, a scheme that was used for most of the mid-war period and at least the earlier part of the late war period. Equipment is a blend of mid and late war (e.g. some MG34 and some MG42) to give the impression of a fighting unit that is slowly upgraded to new equipment while still retaining some of the old. To further the image of a fighting unit, I have applied fairly heavy weathering and some battle damage to the vehicles.
Vehicle identification follows the conventional German figure. The core infantry formations are of the first company, the tanks are of the fifth company. For example, the HQ halftracks are labelled 101 to 103 (the third is for the AT section), third platoon halftracks are labelled 131 to 134 and the second tank platoon is labelled 521 to 524.
Hero: Generalmajor Remer is available as a Hero figure, together with his Schwimmwagen.

Headquarters: The mid war headquarter section includes the commander, second-in-command, a “Püppchen” 8.8cm AT gun, a team with Panzerbüchse AT rifles, and a small motor pool for transport (Sd Kfz 15 and motorcycle for motorised Panzergrenadier companies).

The late war headsquarter section can be transported in Sd Kfz 251/1c halftracks for armoured Panzergrenadier companies. The third Sd Kfz 251/1c is for any attached Anti-Tank elements. The three Panzerschreck teams are only used in specialised formations such as the 78th Sturmdivision or Panzer Lehr. Additional assets include a 2.8mm AT gun and two HMG teams.


If used as a Grenadier HQ, the command group can also incorporate four team sniper group including Major Koenig.

1st Platoon: The first two platoons are the default formations for any company. The core at 6 MG teams and a platoon command with either Panzerknacker or Panzerfaust. Transport options are either 4 Sd Kfz 251/1c (one 10c command) or three Opel ‘Blitz’ 3-ton trucks.


2nd Platoon: Identical to 1st platoon.


3rd Platoon: The third platoon omits the trucks but is otherwise identical. It seemed highly unlikely that a motorised Panzergrenadier company will really need three full platoons in trucks.


I also included two sets of additional bases which could be added to any of the three Grenadier platoons to cover more specialized lists. Each platoon can be augmented with two additional Rifle Teams for an 8 team Rifle/MG Grenadier platoon. Alternatively, a group of 5 MG teams with Panzerfaust can be distributed among the three Grenadier platoons if they are fielded in a 78th Sturmdivision company list.


4th (Heavy) Platoon: The heavy platoon can operate in an armoured or infantry configuration. It includes a full HMG section, a full mortar section and an armoured mortar section with a command Sd Kfz 251/1c and two Sd Kfz 251/2c. All three sections have a command team. The regular mortar section has three observers and the armoured mortar section has a single observer with Kuebelwagen. The platoon can be fielded as a single Heavy Platoon or as individual mortar and HMG groups.


1st Pioneer Platoon: The pioneer platoon can be fielded as both “white” and “black” pioneers as well as a regular line platoon in a Pioneerkompanie. It includes 5 Pioneer teams with command, two teams have flamethrowers, and two teams with Goliath demolition carriers. The Goliath figures are magnetized and can be removed from the base. The command Sd Kfz 251/7d (2.8cm gun), two Sd Kfz 251/7d and two “Stukka zu Fuss” Sd Kfz 251/7d halftracks allow the platoon to be fielded as an armoured Panzerpionier platoon. The single Kuebelwagen is included as a transport for the command team (some late war formations use a Kuebelwagen in Panzerpionier platoons instead of a truck or halftrack).


2nd Pioneer Platoon: The second pioneer platoon is identical to the first but without dedicated transports. It’s extremely rare that a regular formation would have two pioneer platoons attached and even rarer for both of those to be armoured. If the platoons are used in a dedicated Panzerpionier formation then the trucks of the regular platoons would be available for them.


Sturmtrupp: The Sturmtrupp is limited to Ostfront Grenadier formations but plays an important role in that list. It includes the full 6 assault MG teams, a command team and the Hero Oberfeldwebel Wolf Schmidt. Optional heavy sections can be added in the form of 2 HMG teams or 2 Pioneer MG teams.


Scout Platoon: This is a fairly standard formation through all briefings with three scout teams and a platoon command. Four Schwimmwagen serve as transports.

Anti-Tank Sections: Two PaK40’s with command. More PaK40’s and other AT gun varieties are needed to flush out this section but for now this is it.

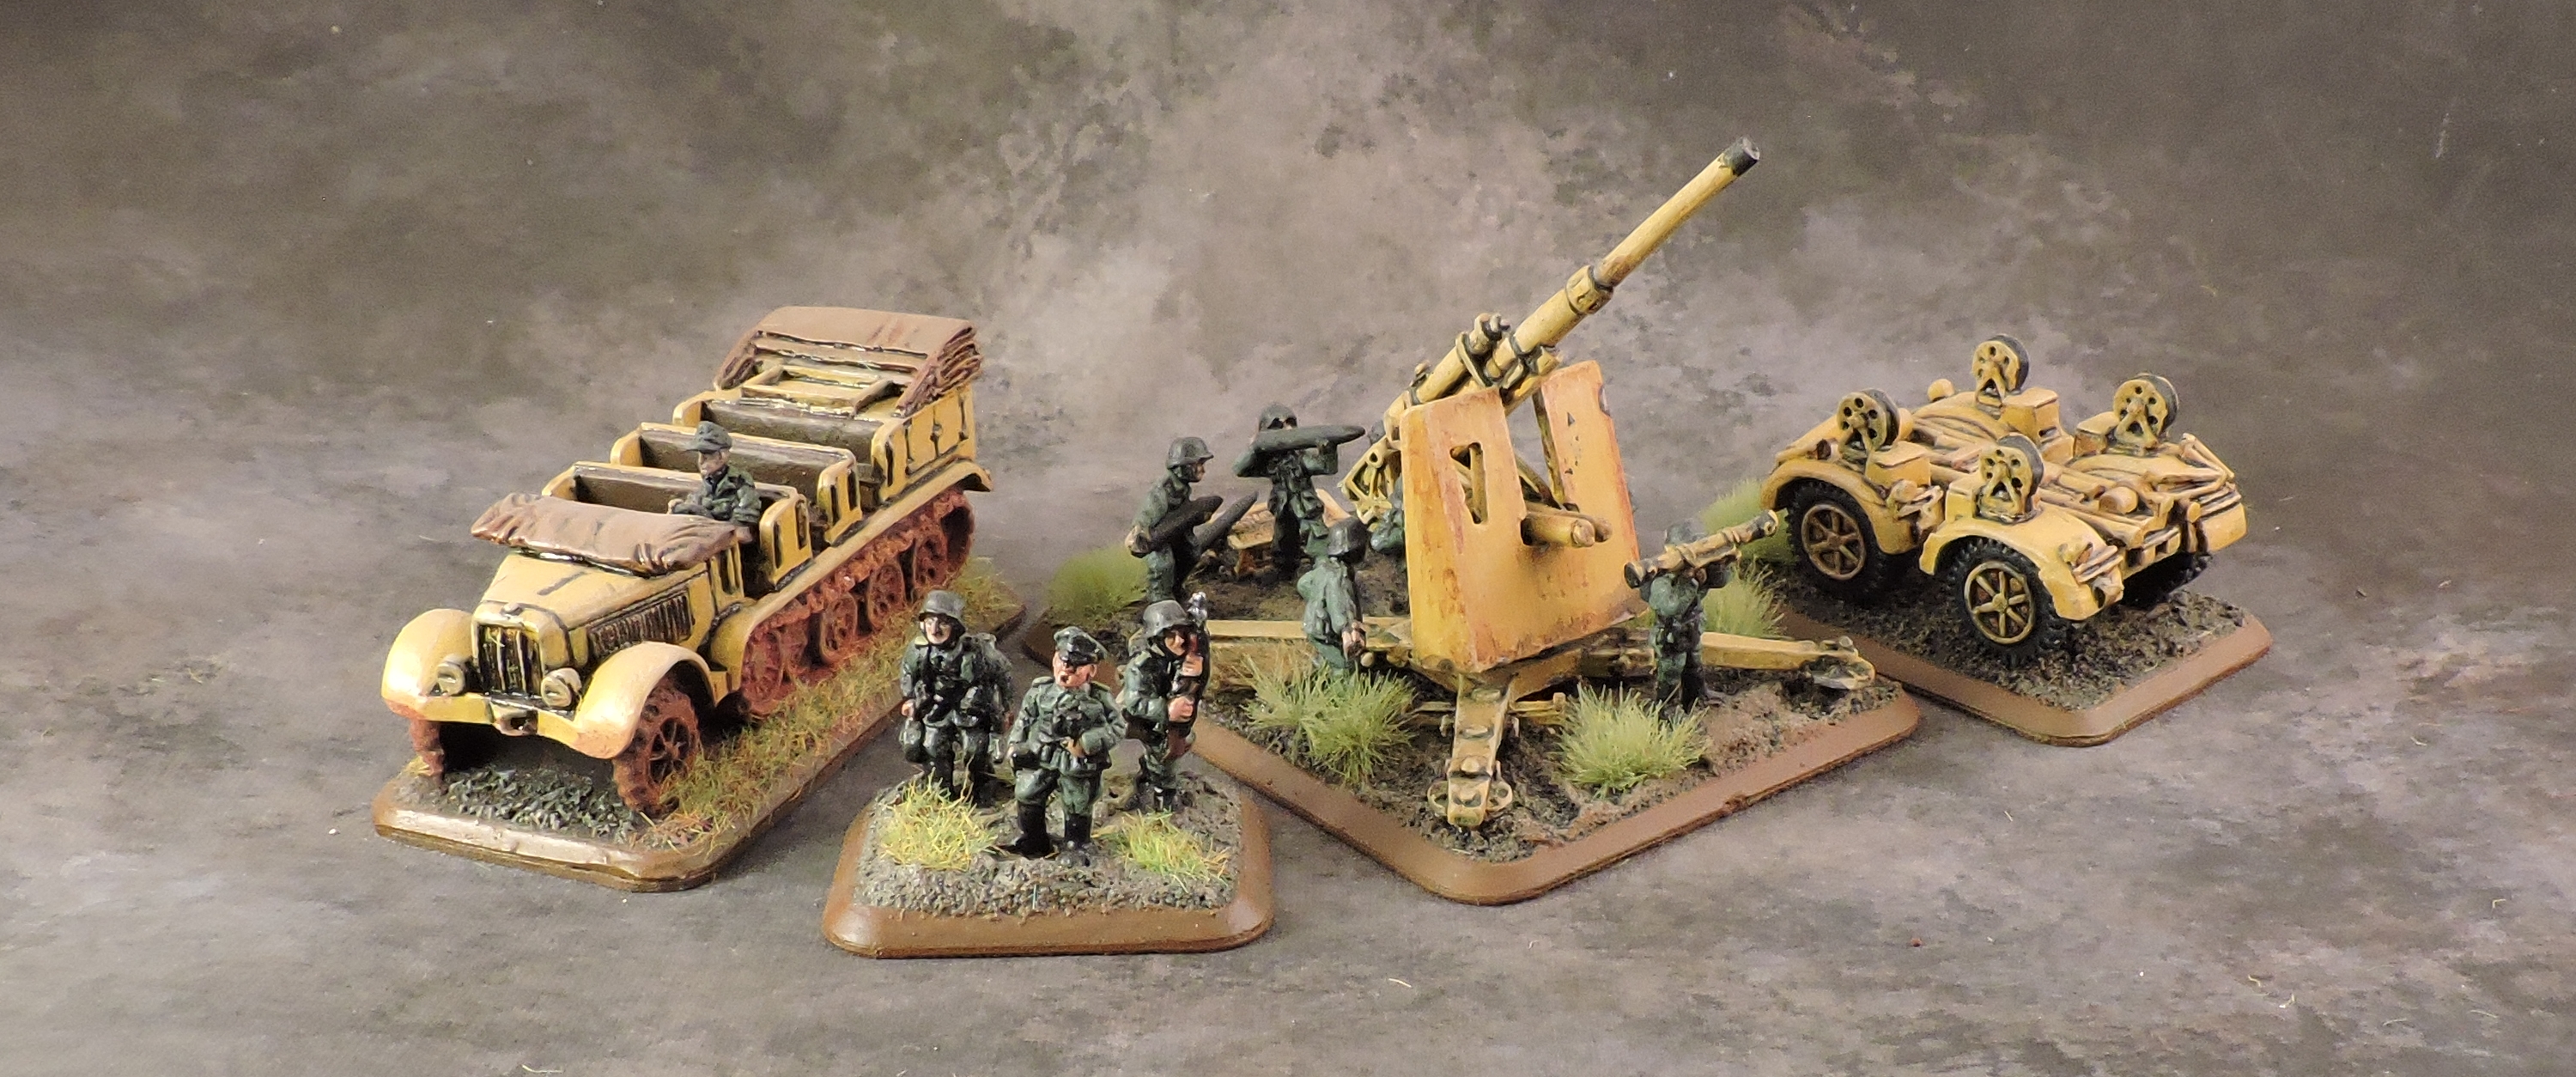
Anti-Air Sections: Two Sd Kfz 7/2 with armoured cabs provide mobile AA protection. A single 8.8cm FlaK36 with command provides static AA.

Infantry Gun Sections: Light artillery units are designed to provide basic support fire for the main troop formations. For this I have a 7.5cm leIG18 section with command and observer. The section has full transportation with Kfz 70 trucks, a Kfz 15 for the command unit and a motorcycle for the observer. Since leIG18’s are relatively short ranged compared to other artillery, I added the transports for some mobility.

Artillery Battery: The main artillery formation is a full battery of leFH18 with staff team, command and observers. The battery doesn’t have transports because I really couldn’t imagine the in-game purpose.


Rocket Launcher Battery: The other artillery option is a single section of Nebelwerfer with command and observer. The observer has a Kuebelwagen.

Recon Vehicles: A small armoured car platoon with a Sd Kfz 231 and a Sd Kfz 263. The Sd Kfz 263 radio variant counts as a normal Sd Kfz 231. I just like the look of the radio version.

Tanks: The tank formations need to cover the different support options for infantry armies as well as provide a complete tank formation. For this I have 3 Panzer IV H which are also labelled as a HQ formation (101 to 103). If fielded as a support unit instead of a tank company HQ, the theory is that the technically incorrect 101-103 label is the result of German units obfuscating their identification to confuse the enemy (as they often did historically).

Additional platoons can be formed from seven other Panzer IV chassis with variable magnetized turrets. Shown here as F2 variants and short-barrelled F1 variant on the same chassis.


I didn’t include any earlier Panzer III figures as they would only be relevant during the earlier stage of the mid war period and thus outside of the scope of the super-set list.
Heavy Tanks: One Tiger and an Elephant tank hunter constitute the heavy tank support. More tanks including Tigers and Panthers are needed in this area to be fully competitive in the the late war period.

Assault Guns: Three StuG IV G assault guns provide armoured support to infantry companies.

Two Brummbaer assault guns offer close range support for infantry companies.

Air Support: 3 Henschel HS 129 variants offer iconic air support. Tank hunting in the Russian Steppes!
Other: I am a firm believer in the visual appeal of wargaming. That’s why we go through all the effort of painting, converting and terrain buildings after all. I therefore dislike the use of counters or dice on the battlefield to identify game dynamics. On the other hand, Flames of War requires a number of game play markers so I made up visually pleasing alternatives. The destroyed Panzer III and Marder are normal objective markets.

The tank crew Bailed Out markers are mounted on pennies for stability but otherwise standard. The dead or wounded German soldier discs serve as Pinned markers.

The Tobruk and R35 Tank Turret Emplacements can be used for Normandy beach landing scenarios. Other markers such as Gone to Ground and Dug In are generic across all armies and can be found in the main Flames of War section.

Battlefront released a skirmish set called “Partisan & Polizei”. I use them as “decoration” during regular games and for the odd actuall skirmish scenario.


7 replies on “German Army”
This is quite possibly the best looking FoW force I’ve seen to date. Such a beautiful army. Would you be willing to provide the infantry and vehicle paint recipes? I’m especially interested in how you achieved your panzergelb and how you did the weathering – did you use pigments? Or paint/washes? Or something else entirely. At any rate, this is all just stunning and an inspiration.
Thanks for the kind words. The painting steps for the vehicles go like this:
1. Undercoat Black
2. Airbrush or brush everything Bubonic Brown
3. A thick coat of Brown ink (or two coats of the newer GW Devlan Mud)
4. Wetbrush Bubonic Brown with a bit of attention to leave the cracks/recesses unpainted
5. Camo strips painted on with Scorched Brown & Catachan Green (I kind of wetbrush these in multiple thin layers so that the edges blend. A solid line works as well but doesn’t look as nice in my mind. You can also just airbrush the lines for an ever softer edge).
6. Drybrush everything Bleached Bone (including the camo, the colour works well enough as a highlight for all of it and pulls things together)
Now come the details.
A. Tracks in Terracotta, then drybrushed Boltgun Metal
B. Tires and undercarriage in black, then wetbrushed grey
C. Interior compartment in Scorched Brown, then Bestial Brown wetbrush and some Devlan Mud wash
D. Tools in Black than Boltgun Metal
E. Fuel drums in Catachan Green followed by Camo Green drybrush
F. Tarp in Vallejo SS Camo Medium, followed by Devlan Mud wash
Finally the “dirtying”:
Everything gets a dilluted black wash to pull everything together. Then I stipple on a mix of black and Boltgun metal near areas with wear and tear (hatches, ladders, etc. I also make a paste of Vallejo Putty (comes in a paint bottle) and various mud coloured pigments. That thick paste goes on the wheels and other low areas. Before the putty is dry I also sprinkle on different pigment colours for variety.
When everything is dried I dullcoat (Testor spray) and paint the windows (Graveyard earth wetblended into Hawk Turquoise at the top, Ice Blue streaks and then gloss varnish). All colours are Games Workshop unless otherwise noted. The camo nets are medical gauze soaked in brown or green household paint for a while and then dried.
Thank you! I really appreciate the how to. Again, such a fantastic force.
Seconded, great painting and a fine undersdanding of German TOE. As a gamer with never enough time or money, I appreciate that you also need to ‘blend’ your force in order to allow it to fight in more than one specific time period.
Question: How/where do you get your CAMMO foliage? The green branches and bushes for the tanks. They look great!
R
Very, very nice paint scheme. I appreciate the fact that you posted how you did it too, because their isn’t too much extra high quality painted flames of war armies floating around the internet. I couldn’t figure out if your camo was a mix of catachan green and scorched brown, or did you paint your camo without mixing colors?
I tend to paint without mixing. That’s really the only way to get consistent results across the whole army. If I really need a mixed colour, I will mix a whole pot of it before I start to paint an army. In this case the colours without mixing. There are brown and green stripes on the vehicles, so Scorched and Catachan Green respectively.
If you are ever interested in selling the entire set. I would love to purchase this. It is a work of art and I would treat it as such